 DIY VW Diesel Injector
Testing
DIY VW Diesel Injector
Testing
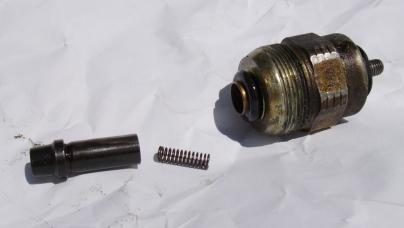
As background, the fuel pump sucks fuel from the tank through a filter and then through a compression system that raises the pressure of the fuel to between a 120 and 160 bar, the injectors themselves have a preset breaking pressure or opening pressure that then allows the pressurized fuel to pass through the injector nozzle where it is sprayed into the combustion chamber.
June 30th 2009, This article is under development check back over the next few days, for more pictures and details.
Cleanliness and a good spray pattern are essential to a good working injector. Black smoke is often caused by an injector that is not atomizing the fuel properly and consequently not all the fuel gets burned on the combustion stroke. There are lots of idea's out there for D.I.Y injector testing mostly modeled after the VW testing device. However I have found that making your own tester is difficult and more complex that required. The VW tester measure the breaking pressure and allows pump up to test for leaking, which if your a pro shop I guess might be useful but for most of us we just need a go no go test. So what I have done is converted an old injector pump from surplus engine that works just great !
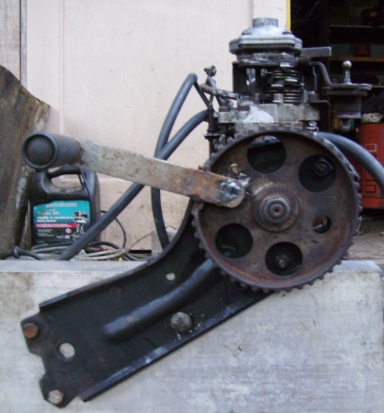
If your main interest is aspirated diesels then you can use an injector pump from a non-turbo vehicle, if you are doing turbo diesels then you will need a pump from a turbo, this can also be used for non-turbo injectors, it just runs them at a higher pressure. The other parts you will need include at least one injector pipe, the timing wheel and a crank handle of some kind as well as a method of mounting the pump I found that the injector pump bracket off an old engine works the best. There are a few other odds and ends like a fuel container and hoses but you figure that out as we go through this here with the pictures and details.
The next problem is the mounting bracket for the pump, a piece of angle steel or aluminum to mount the injector fuel pump mounting bracket off the front of an old engine is best. It needs to have something of a foot to counter balance the pump. I used a piece of box aluminum and riveted a plate on the bottom to act as a foot.
You do want a container to catch the spray from the injector you are testing however.
Once you have the unit built you connect a injector that you want to test and wind the crank 10-20 times to get the injector primed and spraying. The very first time you use it you may have to crank it considerably more to get the entire system primed, but once that's done you can test 4 injectors in a few minutes. Watch the video to see the spray pattern and cranking.